Saturday, 26 September 2020

The Faerie Glen


The Faerie Glen

This is a step by step tutorial to assist those who find watching you tube hard to follow. I thought it might also explain some of the techniques too. 

For this project I am using 140lb or 350gsm watercolour paper. Dylusions inks, Calypso Teal, Lemon Zest and Funky Fuchia. Acrylic paint White. Distress oxide Faded Jeans. Versafine clair inks for stamping.


To begin with spray the 3 inks onto the watercolour paper, then spritz with some water

Using some old plain paper place over the inks and smooth out to remove some of the ink and to slightly spread the ink. 

The ink has now spread and mixed in a more delicate texture.

Taking some white acrylic paint spritz with water to thin slightly.

Mix the white as shown and apply over the inked background. Make sure your paper is dry before doing this, as I found the slightest dampness starts the ink to mix with the white and drags other colours where you do not want them to be. The reason I am using the white is to lighten the inks, dylusions are very vibrant and the white gives the background a misty look.


I am now using the white still to place the water and where I want the waterfall to be.


Another photo showing the water effect


I am now making the sun using the white acrylic paint.

The completed sun 

Now I am starting to add the waterfall, I am using a flat brush getting the paint to a thin point on the end of the brush. Then draw a short line and drag your brush down. The paint should lightly touch the paper so you get a dry brush effect.

Working along the water and placing more falls. The more colour you have in your background the better your falls will become, here it is more pink and darker blue in the water creating an illusion of hidden rocks.

I decided to make this with 2 waterfalls so continue along adding gaps if possible to break them and you can add rocks or mist.

Now I am adding white to add the effect of water. Just lightly touch the paper with the brush.

Now I have the light hitting the water creating various colours giving it a more magical effect. I am not too worried about the marks on the paper I can hide these.

I am now going to use the stencil to give the effect of distant foilage in the background. I used Faded jeans distress oxide for this but any distress ink will work. Stencil is available from Lavinia stamps I will add links below.

This is how the scene is looking with some stencils


I can now begin on the rocks around the waters edge


I have used the stones stencil also available from lavinia stamps.

This stencils I am using as a guide, I will paint these and add highlights.

I am adding the faeries now and the Faerie hives.

Now the other images are stamped I added shadow to the falls and painted in the stones.

Adding some highlight to the stones and rocks. I have added some more rocks in the water.

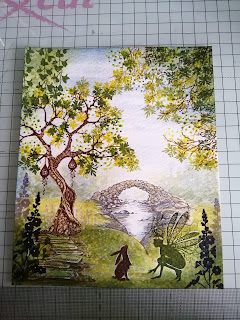
And completed. I the video then thought I would try and cover the marks and added leaves. This you can see in the original piece at the top of this post.

The above is another version using the same inks and techniques in an old hard back book

I hope you try this little fun scene... Holly

Stamps & stencils used are available from 

Lavinia Stamps https://laviniastamps.com/

For the full videos you can find my channel clicking the link at the side.


Sunday, 30 August 2020

Mini Easel Box for Trinkets


Mini Easel box with drawer

I love these little boxes they are great to send as a gift or you can use them as gift boxes. I usually create them using Lavinia stamps so they are mysical scenes on them. The above I created mainly for this blog post so it was slightly rushed to decorate. I ususally place a little charm bottle inside using charms to represent the person or what gift it will be.

To start you need A4 card of your choice I used kraft card for this project as it is stronger. You will need some papers or as i have used some watercolour paper sprayed with inks. Embellishments of your choice.


You need to cut sizes of the card as shown above these are in inches sorry about that.

Easel section:

Cut piece of card Easel stand @ 6 x 3"scored along the six inch side @ 1-1/2 & 3"

Cut piece of card Easel face  @3 x 3 this will be the stand up face card on your easel. 

The size for papers will be @ 2-3/4 x 2-3/4"

Drawer section:

Cut piece of card for Draw wrap @ 8-1/2 x 3" scored along long edge @ 1, 4, 5 & 8"

Cut piece of card for Drawer @  4-7/8 x 4-7/8" scored @ 1" on all four sides

The size for your papers will be 4 pieces @ 2-3/4 x 3/4"


Once you have scored all pieces make the box by cutting down one line of the corners and cut a wedge shape this helps the box align better with the sides. Glue into place the cut tabs to the inside of the box.

The box sleeve fold and glue the 1/2" mark to the inside of the sleeve so it does not show on the outside. This works well if you are just making the box in pattern card.

Fold the easel part as shown in the above photo top right hand corner as you can see it folds and will lay flat. 


The above photo just shows how to make the box up for your reference I use tiny pegs to hold the tabs in place as the glue sets. I find PVA glue the best on kraft card it has a stronger bond.


Attach the easel piece of card to the top of the box sleeve as shown in the above photo. To know you have it the right way round you should be able to lay it flat.

I have shown the 3x3 to the easel so you can see how it should look. Once you have decorated the 3x3 bit of card then attach it to the fold to the bottom of the piece of 3x3 so that the easel and the face lay flat. 


You can see in the above photo that my easel top will lay flat. 


As you can see by the above photo I have now decorated my box using my own design of spray inks on watercolour paper and used a couple of stamps to decorate. I added a little handle to the front this is a brad handle I bought them a few years back now, really wish I had got more. Youu can make handles using beads on wire and pushing the wire through the front and fix behind. 


I prefer my boxes to have feet so they stand up from the surface. I used some bare basics wooden buttons. These I purchased from The Range store, the bag was huge at the time it seemed expensive but I have made endless amounts of these boxes and I still have more left. You can add 2 buttons to raise it higher.


Finally my completed box, as I mentioned this was just a quick make for the tutorial I have added more images to the end of the tutorial showing some different styles.

Hope you try this project out they are easy to make I will add another tutorial for you can add these to a box so keep  watching.


Faerie Style Trinket Box


A varied selection of Trinket Boxes complete with charm bottles


Thanks for viewing keep safe and well

Happy Crafting 

Holly

Saturday, 25 July 2020

Autumn Glory


Todays weather got me thinking about Autumn so I decided to re do the Shanty stamp this time part Autumn theme to represent the changing of the seasons.


I had some off cuts of mount board so decided to experiment with how well it would hold watercolour paints or inks. I have added how I built up the scene and what colours I have used.


The above photo shows a range of inks for painting and the colour ink I used to stamp out the Shanty path and eventually the cute animals and twigs.


To start with I used  Stormy sky and let it drop in to the wet damp board as I stated this is not as easy as with watercolour paper for the water absorbes the board faster. then adding a watered down wash of Fired brick then Wild honey and finally Scattered straw.


I added a little more fired brick to the sky then adding some peeled paint to create shadow. The distant shrubs are using wild honey and a watery bundled sage.


Continued to build and use a mix of wild honey and peeled paint for the grass areas.


Now adding the branches of trees and some hares using versafine clair acorn ink what got missed I was able to use my pro marker alcohol ink in chocolate worked fine. I added some drops of spiced marmalade to give the effect of falled leaves and the moss and ivy on the shanty turning Autumn looking.


Darkening down the area where the hares are and around the path painting the shanty to look a bit weathered like faded wood panels continue to bring in more shadows and shaded areas.


For the final part of the scene I added some leaves using 2 different coloured clair inks and using spiced marmalade distress ink using the dots stamp. Adding some ivy berries and mushrooms to the foreground. Scattered around are tiny flowers and berries in the roof of the shanty. Finally to distress around the top using faded jeans and around the bottom half using peeled paint.


I really enjoy creating these little scenes they are fun to create and very relaxing, unless you have a happy mistake. What every you are creating enjoy and experiment. Keep well.

Holly

Saturday, 4 July 2020

The Birthday Party


Dedicated to Robyn

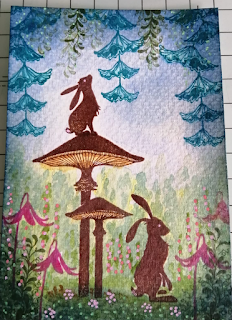
It was a lovely warm sunny day in Lavinia Wood. The trees were full of leaves and the grass was very lush and green. Pipin the hare was rushing around, jumping over the mushrooms and dashing through the tall grass. He came upon a very tall mushroom and stood on top to see around the wood. Along came one of the wild hares from the edge of the wood he was out looking for the rest of his family.
"What are you doing up there?" he asked Pipin. " I am looking for Zuri, it is his birthday today."


The wild hare looked around the wood floor to see if there was any sign of Zuri. After a short time looking around he hopped off into the ferns calling to Pipin. "I will look around this side of the wood and find my family they will help me look too." Pipin thanked the wild hare and hopped off the mushroom and dashed across the grass back into the wood again. After a short time he came upon a very pretty area with lots of flowers and faerie hives hanging in the trees.


Pipin walked up to the faerie Rory who was attending to the faerie hives. "Hello Rory." Rory looked down to see the tiny hare sitting infront of him. "Hello Pipin what are you doing down here?" Pipin looked up at Rory and the faerie hives. "I am looking for Zuri, it is his birthday today, I want to wish him a happy day and maybe hold a party for him." Rory replied "He is in the next garden, past the Sacred tree." Pipin thanked Rory and asked "Can I have some faerie hives for decorations please." "Yes that will be a good idea Pipin I will collect some for you." 
Pipin thanked Rory again and hopped off to his next destination.


Pipin arrived at the Sacred tree he hopped down the path near the faerie bridge and found Oona sitting by the wildflowers. "Hello Oona I am looking for Zuri, have you seen him?" Oona thought for a moment and then said "Yes he is just along the path around the side of the tree." Pipin was happy and hopped with joy. "Thank you Oona I hope you have a nice day." Oona smiled and took flight up to the sacred tree to tend to the faerie hives.
Pipin walked up the path and past the sacred tree. He could see pretty colours and the outline of Zuri, as he got closer he noticed the wild hares family had gathered.


Zuri was at the top of the path and the wild hares had gathered to wish Zuri a happy birthday. Pipin jumped onto Zuri's back admired his colourful mane and tail. "Happy birthday Zuri, you look pretty today for your birthday." Zuri shook his tail with delight. "I am very happy Pipin and thank you." Pipin noticed the faerie hives hanging in the trees, Rory must have hung them up for Zuri he thought and they were glowing with pride. "We should all get together for a party later today", said the wild hare to Zuri. "What a good idea, when it gets darker the hives will shine brighter then everyone in the woods will come along to join us." Zuri replied with delight.

Happy birthday to you Robyn I know you had a magical day love you lots xx

Happy crafting all 

Holly

All stamps used in my creations are by lavinia stamps

Sunday, 28 June 2020

Under the Sacred Tree


The sacred tree is so magical that I decided to create a scene using it to develop a tutorial. I love Oona the faerie and Pipin the tiny hare so I thought I would add them into the scene as well. I love Lavinia's fairy bridge it was a must to fit in the scene too.


Under the Sacred Tree

To begin with I used 300 gsm watercolour paper for I was going to use watercolour paints for the background, cut to size 5 x 6 inch.  I decided to stamp the bridge tree and path using versafine clair acorn for the tree, morning mist for the bridge and path. 


As you can see from the above photo I have added some tree branches also used versafine acorn ink to stamp. Using ultramarine for the sky I added a wash using my wash brush over the inked images. Using cad yellow for the meadow areas. Mixing cad yellow to ultramarine gave me a very misty blue green for the background to resemble distance trees or bushes. 


Building up colour for the meadow and grass areas mixing blues and yellows to get the lush green colour. I added some leaves to the trees using 2 shades of clair inks to create distance . I added a darker layer for the distance of trees just a shade darker.


The above photo you can see the darker shades of the meadow before I added the leaves to the trees. I have also added ultramarine to the water in the stream. This I will darken as the scene builds up.


As you can see the green to the back is lighter and the green to the front is darker adding depth. The water in the stream i have darkened down and created some shadows where the tiny rocks are. I have added more detail to the tress and leaves using dotted stamp in various colours.


In the next photo I have darkened the grass areas, added more details such as tiny flowers in the grass using acrylic pens, the tree is darker now. I added some floral and Oona faerie stamp she is stamped in versafine clair shady lane colour. Adding some hanging ivy in the corner, to try and push the depth more.


I have now added more flowers to the grass areas and around the tree, also adding some effects to it using acrylic paint pens. Adding shade to Oona too.


Finally adding Pipin such a really tiny hare stamped in clair ink acorn colour. adding shadows where needed. I used white pen to highlight some areas such as the stones around the path and characters. To complete I added tiny fairy hives to the tree. To complete I used a light covering around the top distress ink faded jeans and to the bottom peeled paint. 

Hope you can try out this tutorial when you can. I find the clair inks are great for using with watercolour paints when dry you can paint over them lightly and no smudges.

Happy crafting 

Holly

All stamps are available at https://laviniastamps.com/