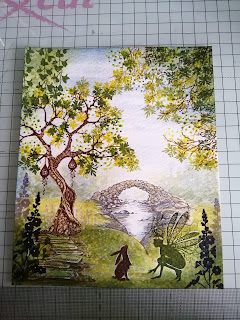
The sacred tree is so magical that I decided to create a scene using it to develop a tutorial. I love Oona the faerie and Pipin the tiny hare so I thought I would add them into the scene as well. I love Lavinia's fairy bridge it was a must to fit in the scene too.
Under the Sacred Tree
To begin with I used 300 gsm watercolour paper for I was going to use watercolour paints for the background, cut to size 5 x 6 inch. I decided to stamp the bridge tree and path using versafine clair acorn for the tree, morning mist for the bridge and path.
As you can see from the above photo I have added some tree branches also used versafine acorn ink to stamp. Using ultramarine for the sky I added a wash using my wash brush over the inked images. Using cad yellow for the meadow areas. Mixing cad yellow to ultramarine gave me a very misty blue green for the background to resemble distance trees or bushes.
Building up colour for the meadow and grass areas mixing blues and yellows to get the lush green colour. I added some leaves to the trees using 2 shades of clair inks to create distance . I added a darker layer for the distance of trees just a shade darker.
The above photo you can see the darker shades of the meadow before I added the leaves to the trees. I have also added ultramarine to the water in the stream. This I will darken as the scene builds up.
As you can see the green to the back is lighter and the green to the front is darker adding depth. The water in the stream i have darkened down and created some shadows where the tiny rocks are. I have added more detail to the tress and leaves using dotted stamp in various colours.
In the next photo I have darkened the grass areas, added more details such as tiny flowers in the grass using acrylic pens, the tree is darker now. I added some floral and Oona faerie stamp she is stamped in versafine clair shady lane colour. Adding some hanging ivy in the corner, to try and push the depth more.
I have now added more flowers to the grass areas and around the tree, also adding some effects to it using acrylic paint pens. Adding shade to Oona too.
Finally adding Pipin such a really tiny hare stamped in clair ink acorn colour. adding shadows where needed. I used white pen to highlight some areas such as the stones around the path and characters. To complete I added tiny fairy hives to the tree. To complete I used a light covering around the top distress ink faded jeans and to the bottom peeled paint.
Hope you can try out this tutorial when you can. I find the clair inks are great for using with watercolour paints when dry you can paint over them lightly and no smudges.
Happy crafting
Holly
All stamps are available at https://laviniastamps.com/


Brilliant tutorial Holly, this will be really helpful when I have a bash later on 😊
ReplyDeleteThank you I will be doing more soon
Delete